How to Build a TV Lift Cabinet
Automation lovers always want to have more and more automated innovative twists in their apartments. Some prefer buying automated stuff, others prefer trying to make something automated by their own hands. One of the brightest examples of DIY automation projects that any craftsman can easily afford to himself even in home conditions is the cabinet for TV lift installation. Here we will look through the detailed step-by-step plan of building the TV lift cabinet with the help automated TV lifts of Progressive Automations manufacturer.
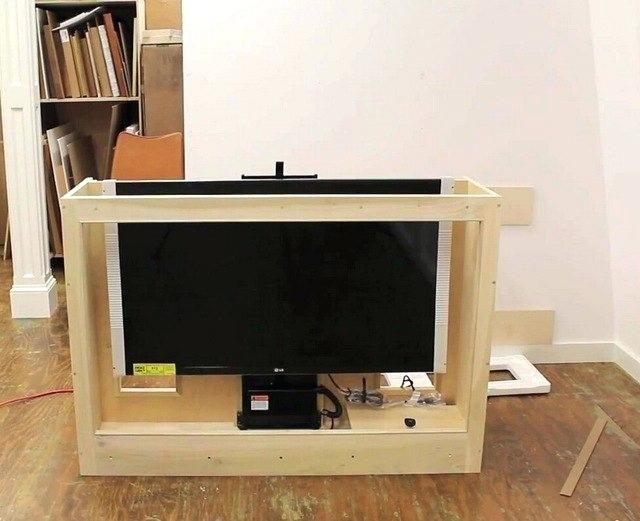
Building the whole construction is definitely would be easier to start from the face frame. Poplar wood might be the perfect material for the construction of painted TV lift cabinet face frame as it effectively absorbs pain. To make the frame the craftsman needs four planks. With the help of pocket hole screws, four planks can be connected together into the face frame. As the material for the cabinet housing would be suitable three-quarter inches birch plywood. This wood will provide the whole construction with solidity enough to sustain the weight of the large plasma screen. Than craftsman needs to cut birch plywood material into pieces according to dimensions wanted. These are two sides, the back and the bottom of the future TV lift cabinet. The sides can be attached to the face frame and to the back with the help of an inch and a half nails and the nail gun. This would be enough to hold planks together until the five-eighths screws will fasten wood parts together more tightly. The half-inch MDF material would be suitable to create the flat panels on the sides and back of the cabinet. Making the stiles on the front side of the cabinet the craftsman has to take into account the thickness of the material. If the stiles on the sides have only three inches, after adding the front stiles the width of the sides stiles will be three plus a half of an inch. Stiles must be attached with the help of wood glue and pinned by a nailgun at the top. Then it is time to attach all rails, also with the help of wood glue and nailgun. With the help of three-eighths cord around the stiles and rails, the craftsman can make the cabinet looking more accurate. It also can be attached to the wood glue three-quarter inch nails. After that, the wood molding should be attached to the top of the cabinet around the perimeter to make it look modern. Under the molding at the top of the handmade cabinet, the craftsman should use the same three-eighths quarter round.
Now the DIY cabinet is ready for the TV lift installation. The next step is making an inch and five-eighths hole for the power source. Then, the two mounting boards measuring two inches and an inch deep must be attached to the back panel from the inside of the cabinet. They must be placed with the same indent from their corresponding sides to make the construction balanced. With the two screws through the bracket in the back of the cabinet and few screws through the mounting plate at the bottom of the cabinet, the pop-up motorized TV lift of Progressive Automations can be mounted inside the cabinet. After this was made the TV screen can be dropped on to the cross brackets. The top of the cabinet can be opened and closed with the help of the piano hinge attaching the top to the cabinet.
Conclusion
Don’t be shy to make your own experiments and make own improvements to the automated TV lift cabinet design. Besides, slight adaptation can turn it into a full-featured stand for the best triple monitor setup. In the diversity is the verity.
- From Local to Global: How to Tweak Your Business for International Payments
- How to Network at Business Events if You’re an Introvert
- Preparing Your Business for Q4
- Sustainable Shopify Store: Apps and Tactics You Need
- Welcoming The Year Of The Dragon: Business Tips From The Far East
- What Bill Cullen’s Apprentice Finalists Should Know About Investment Pitches