Search engines are a cornerstone of the modern internet experience. Regardless of what kind of user you might be, odds are the vast majority of your browsing journeys begin with a search query.
While it’s true that search engines off considerable benefits to us as users, they can also be a double-edged sword.
Specifically, some of the more convenient features that Bing includes, such as the ability to quickly revisit old searches, rely on a function that can hinder as much as it helps.
Fortunately, though the minutiae of how search engines operate might elude many of us, it is possible to delete Bing history with just a few clicks.
As someone who’s been steeped in search engine technology for over a decade, I’m an expert on how to delete your Bing search history.
I’ll walk you through each step easily, so you can regain control of your online data and enjoy worry-free searches from here on out.
What is Bing Search History?
Like most other major search engines, Bing keeps a record of your online activity.
That means it stores data about the terms you search and the websites you access in its history.
Bing also utilizes a feature called the Bing cache.
In the cache, Bing saves a copy of web pages that users visit through the search engine. This means that users can view those pages using the cached copies, even when the original has been altered or is no longer available.
Bing history and Bing cache can both be useful features at times.
They enable Bing to:
- Personalize your experience
- Make searching more convenient
- Tailor your search results to make them as relevant as possible to you
- Easily check old queries and sites you have previously visited
- And view pages that otherwise not be accessible.
However, while the convenience of the Bing history and cache can benefit you, there are risks associated with using these functions.
Why Should You Delete Your Bing Search History?
There are multiple reasons why you may want to delete your Bing history, as allowing Bing to retain a record of your activity can affect your online experience negatively.
Let’s look at the impacts that keeping your search history online can have.
Targeted Ads
Like most other major search engine providers, Microsoft collects data on Bing users’ activities and shares that data with businesses.
As such, the information saved in your Bing history can result in targeted digital advertising when you go online.

This can quickly become tiresome, as the persistence of such ads can feel quite intrusive.
Moreover, you may be bombarded with advertisements for products you are not actively browsing.
This can be incredibly frustrating and degrade your online experience’s quality. By deleting your history, you can help to avoid this problem.
Performance Issues
Due to how Bing history and cache function, they can occupy a surprising amount of storage space on your device.
As you continue to perform searches and visit web pages, the space that Bing history and cache take up will grow.
Eventually, this can affect the performance of your device and harm the quality of your online experience. Deleting your history and clearing the cache can solve this issue.
Privacy Concerns
Most importantly, Bing’s history can pose a legitimate risk to your privacy and cybersecurity.
Since Bing saves all of your searches and the websites you visit, it has access to a considerable amount of private data, such as:
- search terms
- location data
- and personal information.
This provides a clear profile of you as a user, which can jeopardize your security should this data fall into the wrong hands.
By retaining a log of your online activity on Bing, you put yourself at increased risk of a cybersecurity breach.
Deleting your history clears sensitive information, reducing the risk factor.
Where Do You Find Your Search History on Bing?
Fortunately, accessing your search history is a relatively simple process.
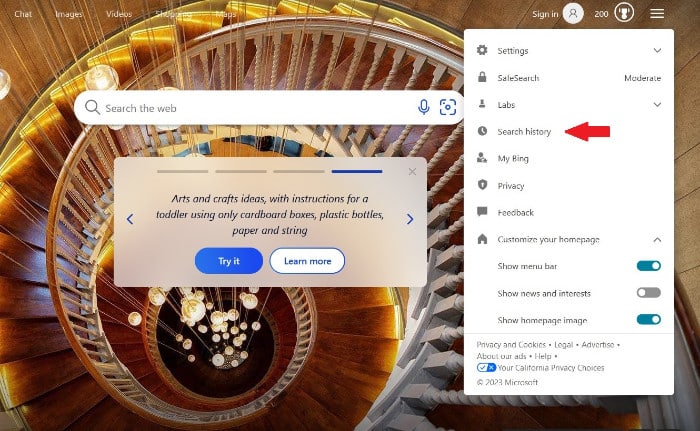
Start by selecting ‘Settings and quick links’ from the top right of the Bing homepage menu.

Then click on the pop-up menu and choose “Search history.”

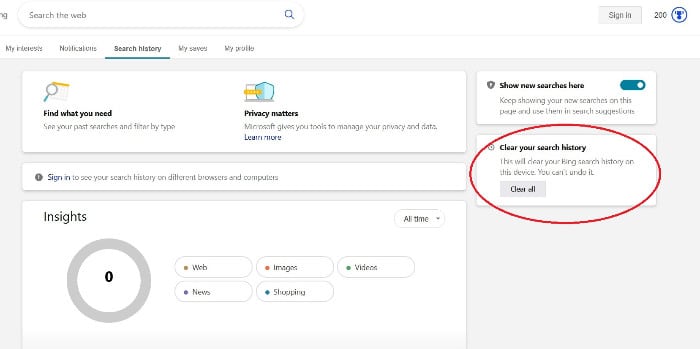
This will take you right to your search page, where you can manage how much information you share.

How to Delete Your Bing Cache
To delete your cache, you will need to use your browser. In each browser, the process of deleting your cache is slightly different.
On Firefox, for example:
- Go to the ‘History’ tab in the upper right of your screen.
- Choose ‘Clear Recent History.’
- Select how much history you want to delete, and click on the arrow next to ‘Details.’
- Check ‘Cache’ and press’ Clear Now’.
On Chrome:
- Press F12.
- Go to the “Network” tab.
- Check ‘Disable Cache.’
- Right-click on any page and select ‘Empty Cache and Hard Reload.’
Once you have completed these steps, your cache should be completely cleared.
How to Delete Your Bing Search History on Bing
You can also delete search history on the ‘Search History’ page.
- To do this, select the checkboxes beside each record you wish to delete.
- Once you have selected all the items you want to remove, hit the delete button at the top of the screen.
This will permanently erase your search history from Bing.
By deleting your search history from Bing, you can enjoy a more secure and private online experience.
Can I Use a VPN to Hide my Bing Search History?
A virtual private network allows you to route your online traffic through a network of private servers using a secure tunnel.
Your VPN will mask your IP address, making it more difficult to identify you online.
Furthermore, it will use encryption to protect your data and prevent others from monitoring your activities, Bing searches included.
When you connect to the Internet using a VPN, you browse securely and anonymously.
This helps you to protect your personal privacy and stop others from viewing your Bing search history, thus allowing you to have a safer online experience.
Conclusion
To conclude, though Bing history and cache can make some aspects of your online experience more convenient, they are equally detrimental to others, with privacy and security being chief among them.
By deleting Bing history and utilizing a VPN, you can protect your personal data and enjoy a safe and secure browsing experience.
Now we’d like to hear from you; How do you manage your online security and privacy? Share your thoughts in the comments below.


